The mobile PDF report problem
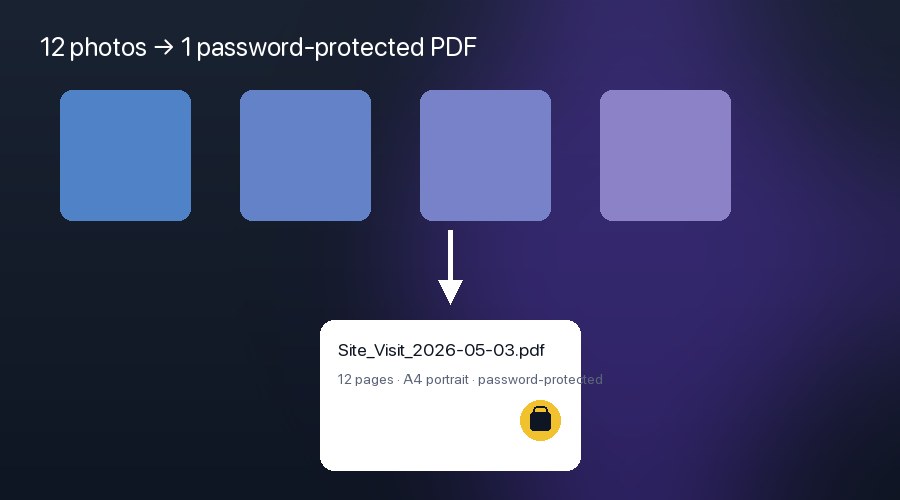
You're back from a site visit with 12 photos. By the end of the day they need to be one numbered, password-protected PDF in your client's inbox. The "easy" path used to be: AirDrop the photos to a Mac, open Preview, drag them into one document, export as PDF, set a password, email. Twenty minutes if everything cooperates.
In 2026 the same workflow takes 90 seconds on your phone. Here's how — three different ways, with the Snap Markup multi-photo flow as the recommended path.
Method 1: iOS Files app (built-in)
Apple's Files app can convert a multi-selection of photos to one PDF in two taps. Long-press the first photo, tap-add the rest, tap the Share sheet, scroll to Save to Files. In Files, long-press the new folder and pick Create PDF.
Pros: built in, no install, no signup.
Cons: no page reordering, no rotation, no password protection, no compression options. Photo order is alphabetical by filename. Page orientation matches the source photo.
Best for: three photos in a known good order, no security needed.
Method 2: Apple Shortcuts
Build a Shortcut that takes a multi-photo input, runs Make PDF, and saves to Files or shares. You get a tiny bit more control — orientation, file naming — but still no password and no per-page rotation.
Pros: automatable, can be triggered from share sheet.
Cons: setup time, still no security, page rotation requires a separate Shortcut step.
Best for: people who already love Shortcuts.
Method 3: Snap Markup multi-photo PDF (recommended)
Snap Markup's Generate PDF flow is built specifically for inspection-style report generation. It's the only mobile workflow we've found that gives you arrangement, rotation, quality control, and password protection in one screen.
Step-by-step: build a multi-photo PDF
- Open Snap Markup. From the Home grid, tap the floating + button → Generate PDF.
- The system photo picker opens. Multi-select every photo for the report (any order — you'll arrange next).
- The arrangement screen shows your photos as a 3-column grid. Long-press a thumbnail and drag it to reorder. Tap the rotate button to flip a page 90°. Tap a thumbnail and the trash icon to drop it from the report.
- Tap Generate at the top. The PDF Options sheet pops up.
- Configure:
- PDF Name — e.g. Site_Visit_2026-05-03.pdf. The default is a timestamped name.
- Image Quality — Low / Medium / High. Medium is the sweet spot for shareability.
- Orientation — Portrait or Landscape. Affects the page layout, not the photo orientation.
- Output Type — PDF or an Image bundle. PDF for reports; image bundle if the recipient wants individual files.
- Password Protected — toggle on, type a password (with eye icon to verify). The PDF will require this password to open in any standard reader.
- Tap the checkmark. Snap Markup composes the PDF and opens it in Apple's Quick Look so you can preview every page before sharing.
- Hit Done in Quick Look. Snap Markup automatically dismisses the arrangement view too — you're back at Home, the PDF is on your device, and you can share it via the iOS share sheet to Mail, Messages, Files, or any other target.
What about the photos themselves?
Snap Markup PDFs preserve every annotation you applied to the source photo. So a typical inspection photo workflow looks like:
- Capture photos throughout the visit
- For each photo: AI Face Blur any bystanders (guide), add the Date & GPS Stamp (guide), draw arrows or callouts
- Run the multi-photo PDF flow above
- Email the password-protected PDF to the client; share the password via a separate channel (good security hygiene)
End-to-end, that's about a minute per photo and a few seconds for the PDF generation.
Tips for cleaner reports
- Use Medium quality unless your client specifically needs print-ready files. High quality bloats the PDF for marginal visual gain.
- Page margins are 36 pt by default in Snap Markup, matching standard print conventions. Photos are inset with proper aspect ratio — they won't get squished.
- Naming convention. Adopt a YYYY-MM-DD prefix so reports sort chronologically in any file manager.
- Cover page trick: drop a photo of a printed cover sheet (or a phone screenshot of one) as page 1 of the report. Faster than fighting with PDF cover-page apps.
Why one app beats five
The argument for Snap Markup over the cobbled-together Files-app workflow is friction. Every tool — annotation, AI blur, stamp, measurement, multi-photo PDF — lives in one editor with one mental model. You stop context-switching, your reports get out the door faster, and the per-photo annotation quality goes up because the friction to add an arrow has dropped to a single tap.
Download Snap Markup on the App Store or Google Play. Read our step-by-step guide for the full editor tour, or check the services page for every tool the editor ships with.