Why blurring faces matters in 2026
Photos travel further than ever. A field photo you take on a job site can end up in an inspection PDF, a Slack thread, a status email, and a public report. Each hop multiplies the people who can identify the faces in the frame — bystanders, customers, employees who never consented to being photographed.
In 2026 the legal landscape has caught up. GDPR Article 4 (in Europe) and a growing list of US state-level privacy laws treat identifiable face data as personal information that requires either consent or a legitimate interest. The simplest mitigation is also the cheapest: blur the face before the photo leaves your device.
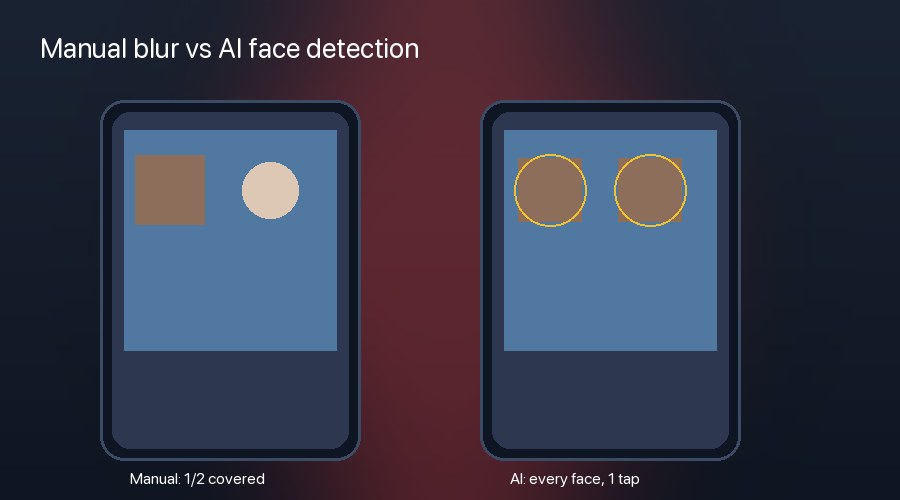
Manual blur vs AI face detection
There are two ways to blur a face in a photo on a phone: manually, by drawing a rectangle over the face and applying a pixelation, or automatically, by letting an AI face-detection model do the work for you.
Manual blur works fine for one face. It falls apart fast on:
- Group photos where you'd have to draw 12 rectangles
- Crowd shots from events where new people walk into frame
- Batches of photos from a site visit where you'd have to repeat the same gesture for every shot
- Distracted moments — humans miss faces, especially in the corner of the frame
AI face blur catches every detected face in one tap. It's not perfect — partial profiles or heavily-shadowed faces sometimes get missed, and false positives still happen on poster art behind the subject — but it's an order of magnitude faster than manual.
How AI face detection works (briefly)
On iOS, Snap Markup uses Apple's Vision framework — specifically VNDetectFaceRectanglesRequest — to find every face in the photo on-device. The model returns a list of bounding boxes; we apply a pixelation filter to each box, on the device, in milliseconds. No image data leaves your phone.
This matters because some "AI" photo apps stream every image to a cloud GPU for processing. That's faster on slow phones, but it also means your face data lives in a third-party data center for some retention window. On-device Vision processing eliminates that risk entirely.
Step-by-step: blur faces with Snap Markup
- Open Snap Markup and pick a photo from your library — or capture one from camera.
- Tap Background in the bottom toolbar (the icon with the figure-and-background graphic). The first time you open it, a help sheet explains the options.
- Choose AI Face Blur. Snap Markup runs the Vision detector and shows a yellow ring around every detected face for a moment.
- Each face is automatically pixelated. If anything was missed (rare), tap the regular Mosaic tool and brush over the spot manually.
- Tap Done to commit the blur into the canvas. The change is non-destructive — you can hit Undo even after committing.
- Save or share via the iOS share sheet.
Tips for batch-blurring photos
If you're processing a stack of photos from a site visit or event:
- Use the multi-photo PDF flow from the Home FAB (the floating + button) → Generate PDF. Pick all the photos at once, edit each one with AI Face Blur, then export to one password-protected PDF.
- Combine with the Date & GPS Stamp tool so each photo carries its own provenance after the blur. Read our field inspector's guide for the full workflow.
- Customize the toolbar so AI Face Blur sits next to Mosaic for fast cleanup of any AI miss. Settings → Edit → Tool Order.
What the AI catches and what it misses
From our six-week testing, the Vision-based detector reliably catches:
- Front-facing faces from passport photo all the way down to ~32 px wide in the frame
- Three-quarter profiles down to about 45° rotation
- Faces with sunglasses, hats, masks (yes, all of them)
It struggles with:
- Pure side profiles (90° turn) — Vision is rectangle-based, not landmark-based, so a face presenting only one ear may be missed
- Faces smaller than ~24 px on the longest side
- Heavy backlight where the face is silhouetted
For these edge cases, fall back to the regular Mosaic tool — it still gives you full control with adjustable brush size and density.
Privacy by default
Once you're using AI Face Blur as a habit, the second-order effects matter most: every photo you share — to your team, to clients, to the public — has the privacy mitigation baked in. You stop thinking about it. The legal exposure, the awkward "wait, can you re-share without that person in it" Slack ping, the post you regret — all gone.
Snap Markup runs ad-free, processes everything locally, requires no signup, and is free on Google Play (one-time purchase on the App Store). Download it from the App Store or Google Play, and check our privacy policy for the full data-handling story.